S.B. Roll No………
ENGINEERING
DRAWING-I
1st
Exam/Mech/Auto/Prod/2655/Dec-2011
Time: 3 Hrs. Max.
Marks: 100
Note: Attempt
any five questions.
SECTION-A
Q1. (a)
Print the following, sentence in upper case single stroke, vertical letters
with height-8mm in the ratio 7:4 “EARTH IS ROUND”
(b) Show
five different types of lines used in engineering drawing, giving their
purpose.
Q2. (a)
Show with sketches what are (i) Size dimensions (ii) Location dimensions
(b) Give
sketches to show how the following are dimensional; threaded holes, angles,
tapered surfaces, countersink holes, curves.
Q3.
Construct a diagonal scale 1: 50 shows meters, decimeters, and centimeters,
long enough to measure up to 6 meters. Indicate on this scale a distance of
4.65 meters.
Q4. (a)
End A of line AB is 20mm above HP and 35mm min front of VP while end B is 15mm
behind VP and 30mm below HP. Draw projections of the line taking distance
between its end projective as 50mm.
(b) Draw
projections of a line PQ, 50mm long lying with one of its ends touching VP. The
line is parallel to Hp and perpendicular to VP is 25mm above HP.
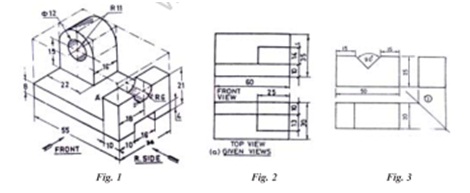
Q5. Isometric
view of an object is given in fig.1. Draw its front view, top view, and side
view.
Q6. (a)
Give conventions for showing section of (i) cast iron (ii) Gun metal (iii)
While metal/lead (iv) Wood (v) Asbestos
(b) Shows conventional breaks
for the following:
(i) Rectangular Section
(ii) Round section
(iii) Pipe or tubing
(iv) Rolled Section
(v) Channel Section
Q7. A
cylinder of base diameter, 50mm and height 100mm rests centrally over a cube of
60mm sides. Draw isometric view of the assembly.
Q8. (a)
Two views of an object are given in Fig.2. Draw its third view.
(b)
Three views of an object is shows in fig.3 with some missing lines. Provide the
missing lines. Provide the missing lines
and completer the views.


0 comments:
Post a Comment
North India Campus